Wednesday, July 29, 2009

Blogging is serious business.


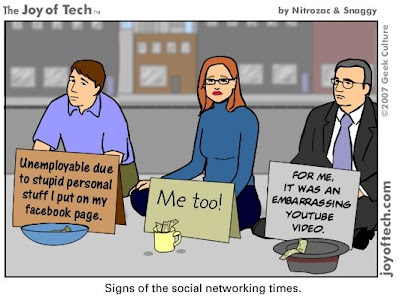
The blog is the new resume. At least according to software developer Adam Darowski and others joining in on this conversation on his blog. Darowski names at least three benefits to thinking of your blog as a potential resume: a blog gives potential employers a more complex sense your role on a project, your day-to-day activities and your personality.

Since our internship program at ITSRG emphasizes career skills, here's an activity that you might try with your group in order to bring home the idea that a blog is an enduring and findable public representation of yourself and therefore should be taken seriously.

1. Have students read the posts listed above or another article about using social media for professional purposes or minding their online identity.

2. Lead a discussion focused on the benefits of having a findable and professional online identity. Address the dangers of inappropriate content, but don't dwell on them. The idea is not to make them scared of being found online. Instead, get them thinking about how having a positive online presence can help them achieve their career goals.

2. Have students work in pairs and have them imagine that they are interviewing each other for a job. You can assign them a specific job to interview for, ("imagine that you are applying for a position as a community organizer") or you can ask them about their career goals and have them imagine applying for an entry-level position in their desired career track.

3. If students already have resumes, have them exchange resumes with each other. Then, task each "potential employer" with using the information provided in the resume to find the "job candidate's" online presence. Let students know that they can search anywhere on the web they want. Suggest Google and Facebook for starters. You may want to try to find a few students first to see if any of them already have an online presence so that you can be prepared for the outcome of this exercise. If you prefer, you can simply ask students to examine each other's blog posts.

4. Let them know that as a "potential employer" they will need to present their hiring recommendations to the rest of the company at the end of their search. They will need to keep track of what they find by saving the links to a word doc and taking notes as they go. You may ask that they organize the presentation around these questions:

*Based on your online search, what skills and work experience does this job candidate appear
to have?
*What kinds of things are they interested in? What special knowledge do they have?
*Does the job candidate have a professional online presence? Please explain.

5. After each "potential employer" presents his or her hiring recommendations, discuss some ways that the job candidate could continue to improve his or her online presence.

Thursday, July 23, 2009

Wednesday, July 22, 2009

A podcast about a mapmaker.

Transom presents Fake City, Real Dreams, a podcast that could not fit any better into our program!

Mapmaker Neil Greenberg has created a fictional city, with its own narrative including fictional characters, all based on a detailed map of a place that does not exist. The people of Fake City ride bikes as their main mode of transportation, they've implemented recycling programs and their community gardens are thriving.

Not only is this an example of the kinds of stories that can be told through audio, it also hits on many of our program's key themes: maps, city planning, bike riding, environmental awareness, it's all here.

Consider having your students follow Greenberg's lead and make their own map of their own fictional city. Maybe they could even plan a fictional university campus...

You can also use this as an opportunity to talk about digital storytelling. Let your students explore all the different ways this information is presented: audio, images, text and interactivity. How can they integrate these same elements into their blog to tell a story?

Intro to Podcasting

This week, each intern group will be creating their own podcast. Technically, since they will only be making one, as opposed to an ongoing show that people can subscribe to, this might not fit into the strict definition of the term podcasting, but the main thing is that they will write, record and edit an audio story.

Since we'll be entering new territory, you might use this video from Common Craft to get everyone on the same page with Podcasting in Plain English.


Just like we did when we first introduced the idea of blogging, start by having your group find podcasts on topics that interest them.

Teaching Online Journalism -- A blog from a journalist and educator and another voice confirming that the first step in this process is to listen to podcasts. She proposes a few that she likes to get the ball rolling.

Directories are also a good resource that allow you to search by category or interest in order to find podcasts you like.

Steps to a podcast.

There are two levels to creating a podcast: the content and the technology. I tried to put a little of both in this post. You'll find more detailed how-to's in the links.

1) Have an idea for a podcast. If you don't have one, then start by reading, listening and talking to people. Get curious about something and start brainstorming questions you're wondering about. One basic mode of storytelling that I find pleasurable is following a narrator from the state of "not knowing" to the state of "knowing." Your outline is as simple as asking a question, searching for answers and coming to a resolution about how the answers (or lack of answers) are meaningful for you and your listener.

Whitney Pastorek, writing for Transom.org, has this to say about how to come up with a story idea:

Oh good lord. I have no idea. And in fact, when I wander over to the Tools Talk Beginner board, I find more often than not that the "How do you get your ideas?" question is greeted with a lot of, "Well, you just have to figure that out for yourself" which is totally unhelpful but tragically true.

The way I see it, there are several different kinds of radio pieces one could put together.

  • straight interview, one on one
  • journalistic piece, made up of interviews, sound clips, some unbiased reporter-ish narration
  • narrative piece, made up of interviews, sound clips, and your own feelings
  • storytelling, personal accounts, readings
  • 2) Write a script. Or at least an outline. This is the most important step. Even if you will have some spontaneous parts of your podcast, such as an interview, you'll want to plan an introduction, a middle and a conclusion around those pieces. Indicate when you want to add music and what kind of music you want to hear. Aim for a five-minute podcast. Keeping listeners engaged for a full five minutes is harder than it seems. If you're wondering what a podcast script might look like, check these out.

    3) Do any recording in the field that you think you will need. This is where to do your interview with someone at their office or record the sound of ordering a latte at Starbucks or narrate your walk through the park one morning.

    4) Listen to your field recording and create an audio log by noting the parts that you think you will use in your podcast and where they are in the recording.

    5) Revise your script to shape it around your field recordings.

    6) Do any necessary sound booth recording. This will likely be your narration, your intros, your transitions, your conclusion. Here at Temple, we use sound booths called The Whisper Rooms.

    7) Following your script, edit together your field and studio recordings and add music as planned. This video, created by John G. Hendron, will take you through creating and editing a podcast in Garage Band. If you stick with it through the first half, you'll learn the basics. If you're into keyboard shortcuts, check these out.


    8) Have someone listen to your audio story and give feedback. Edit again.

    9) Upload your podcast to the Internet using a free host, such as Talkshoe.com. This will create a URL for your podcast.

    10) Post your podcast to blogger. To embed the URL you created with an audio player, check out the handy code provided by Cogs for Blogs.

    Other resources:

    Kathy E. Gill, from the Department of Communication at the University of Washington, Seattle has put together a wealth of resources on creating a podcast for her course in New Media.

    Friday, July 17, 2009

    Barking with the Big Dogs


    Here's an exercise that can support discussion about the likely users of your blog and your blog's reach.

    1) Reflect on your blog's key themes. You may want to refer to your creative brief and even take the opportunity to refine it. Try to think in both the specific and the general (i.e. Environmental Issues vs. Water Pollution in Philadelphia). Agree on a few key themes as a group.

    2) Assign a theme to each group member (or work in pairs). Challenge your interns to identify the three most popular websites on these themes. Of these, have them identify the one that is most closely related to what your group has been or wants to be blogging about. Make sure they justify their selection.

    3) Give them about 15 - 20 minutes to explore the website. It does not have to be a blog. Have the students open up a word document in google docs in order to take notes on what they find. Use the opportunity to mention the dangers of plagiarism in the online environment of cut and paste.

    4) Challenge them to generate a blog post which introduces their readers to this website. Require that they not only briefly describe the site, but also evaluate and respond to the site. What is notable or valuable about this resource? Who is the intended audience? What information is left out? Is the site a reliable source of information on the topic?

    5) If the website is a blog or allows feedback, have the interns leave a comment.

    6) Introduce students to the "blog list" or "link list" gadget, which can be found by going to "Layout" and clicking on "Add a Gadget." (This is how I added the list of our intern blogs that you see on the side bar of this blog.) Have interns add the website they found to this list.

    7) Discuss how the act of linking to and posting on the websites of the "big dogs" may help drive traffic to their blog.

    The "how to drive traffic to your blog" articles I've read always include a point or two about leaving comments on other people's blogs.

    Thursday, July 16, 2009

    Revisioning History


    The news is a great place to go for inspiration on lesson plans and assignments, especially when you're working on media projects. Today was the 40th Anniversary of the Apollo 11 launch, the first manned mission to land on the moon. This morning, NPR did a great story on the mystery of the original tapes, which were lost, or as the story explains, possibly taped over! (Yikes! And I thought it was bad when my mom taped over my old New Kids on the Block videos.)

    Here are some thoughts about how you could use the Apollo 11 anniversary to lead a discussion about media representations of historical events. You can adapt these steps to any historical event captured by the media and then re-captured through digital enhancement or fictionalization.

    1) Ask your students what they already know about the Apollo 11 landing and record these "keywords" on the board.

    2) Then, use the "keywords" they generated to add context to the event through Internet research. For example, have them find out what else was happening in 1969. Continue to add information to the board as they suggest more keywords.

    3) Listen to the NPR radio story, Houston, We Erased the Apollo 11 Tapes and/or the NPR video, Apollo 11 Landing: A New View, which shows the difference between the originally broadcast images and the digitally remastered version. Your students may even find these on their own through their Internet research.


    4) Lead a discussion about the story. This could be a good opening to discuss the role of media in documenting history, the authenticity of digital enhancement and the importance of historical documentation and maintenance. (This is a great tie-in for our program at ITSRG, since many of our interns are working on projects about representing historical events, cataloging documents and creating media.)

    You may pose the following questions:

    What is the difference between the original and the digitally remastered video?
    Which video is "the real thing?"
    How do we evaluate media images for truth or authenticity?
    Why is it important to preserve historical documents?
    Who decides whose history will or will not be documented?
    What role does the Internet play in documenting history?
    What kind of digital footprint are you leaving behind?

    Wednesday, July 15, 2009

    A good "how to" article.

    I don't know about you, but I love a good "how to" article. The only thing better is an article that tells me "how to" in a few simple steps.

    At our staff meeting this morning, I suggested a brief seven-step process for creating blog posts. My goal was to keep it simple so that the steps could be easily shared with our interns. I also wanted to stress the importance of using blogs as a means of connecting users to information through linking. This is also referred to as connective writing.

    1) Pick a topic or question.
    2) Research and take notes.
    3) Embed important links.
    4) Write an introduction to your blog post. (even better, write an outline!)
    5) Add descriptions for your links. (what will we find when we click and even more importantly, what do you think about it and how does it relate to other information you are presenting?)
    6) Revise, rewrite and add more links.
    7) Add images, preview and post.

    Since generating this super-simple-step-by-step, I found much more sophisticated how-to's about blogging available at DailyBlogTips.com.


    This article focuses on generating Better Blog Post Ideas. Our staff agreed that coming up with blog post ideas was by far the most difficult step in the writing process.

    Thursday, July 9, 2009

    Using a creative brief.

    A creative brief is a document often used in advertising to keep a creative team on the same page. It includes information about the intended message and audience for the communication or campaign. Make no mistake, a blog is not an advertisement, but some of the principles of strategic communication may still apply. The name of the blog, the images and colors used and the style of writing all act as a kind of advertisement for anyone who finds it and asks themselves, "hey, what's this all about and is it worth my time reading it?"

    If you have not already completed your creative brief, you might check out the below videos to introduce the concept of the creative brief to your students.


    You may also bring up some of the below questions for discussion.

    How is your blog user different or the same as a "customer?"
    How is a blog user different than an "audience"?
    What is a brand?
    What are the benefits of branding your blog?
    What story does your blog tell?
    How will the words and images you select help users understand what your blog is about?

    Wednesday, July 1, 2009

    How do I integrate other googls apps into my blog?

    Need to review some basic tutorials? Looking for inspiration? Here are some of the resources we shared during Day 3 of training:

    Google Earth Tutorials. All of the Google Earth tutorials Aaron shared with us (and more!) can be found here. Think about the possibilities for embedding audio/video/pictures, creating a tour and adding all this to your blog...

    Google Sketch Up Blog. A central place for all things "sketchy."

    New to Google Sketch Up Tutorial. "Draw shapes and pull them into 3-D." Looks easy! What kinds of projects can you imagine using this tool? How can this help you make blog content more engaging for your interns AND for your blog's users?

    Google Maps Tutorials. Create maps with embedded media and share for all to see!
    Flickr (by yahoo). Create a profile, upload your photos, post them to your blog and add them to maps...

    Blogger. Seriously could not be easier to use. Customize, add gadgets, add your tweeter feed, etc. Ashley made some great comments about BRANDING YOUR BLOG. This is something that needs to come from your students. What is a brand? What signals can you send to you users so that they know what to expect from your blog? How does the title, images and body copy (the words) convey the look and feel of your blog? You can have a discussion with your students about branding by talking about commercial products and advertising, such as the MAC vs. PC television commercials. These ads are all about branding.

    Twitter. Green Gertrude will be promoting your blogs using twitter (140 characters) and you can too! Use hash tags so that people can find your tweets (use the hash tag: #greenphilly to stay connected). Use tinyURL.com to shorten URLs that you want to share.

    Remember, AL-22 is a space you and your students can use to access Google Earth and Google Sketch Up.

    Have an idea you want to share with your fellow supervisors? Add comments below and let us all know what you're thinking. What looks cool? What looks scary? How will you use these apps to engage students and create content for your blog?

    -kg